It is foggy, drizzly weather here. Not cold, not hot, not unwelcome. Well, my hair has looked better, but in the South you have to expect a lot of bad hair days. I think that is why the Bouffant style was so popular. If your hair freaks out to new heights - go bigger! Make it look intentional!
This picture was borrowed from a Google search. It is not me. This just comforts me that things could be worse. I could have those zebra bangs.
Anyway....
February wraps up another Schnibble project. I was not able to come up with ISTH in time to make it, so I substituted Reveille. I have been wanting to use the Lila Tueller "Spirit" charm packs I hoarded, so here it is. I love the bright colors and girly prints of Spirit. And anything from Miss Rosie's Quilt Co is fun to make!
No, not quilted yet. I need more peace and quiet and free time than I have right now to do that. I may just put it away for someday quilting. There is quite a pile in that someday quilting box already!
What are you doing with your extra day of February? I wonder how many babies will be born today and find they got shorted in the birthday department? I think that would be hard for a kid.
Our weather has been more like a long, long Autumn here. It has only gotten really cold a few nights. Usually we have a few weeks of temps in the teens at night and frost-ruined plants. Mostly it has been light jacket or no jacket weather since November. I think Europe cornered the market on cold weather this year. Maybe it will help their economies?
My grandson's birthday is fast approaching. He'll be 3! He can tell
people the date now. "March Tur-teenf" and holds up 3 fingers. Sometimes
he holds up 2 fingers and says, "I'm this many, then I will be this
many" as he adds another upright finger. His sarcasm is developing nicely because he recently replied to a waitress who asked him when would he turn three and he said, "on my birthday." Duh!
Also in the near future we have a diverse range of outings: the Gulf Coast Renaissance Faire, because all little boys want to see knights on horseback and royalty etc. There is also an upcoming monster trucks show, the new season starting at Five Flags Speedway (this year Tyler should be up to going once a month or so) and baseball games at the new stadium, and trips to the beach. Not the height of culture, but again this is the home of the bouffant hairdo. We ARE the people of Walmart. I do what I can with what we have...
Last weekend we went to watch the Ice Flyers play some good hockey. And win. I think Tyler was more interested in the loud music, stomping, cheering and projectile prizes than the game. He did get a commemorative Daytona 500 hat. And a date with Papa and Nana. That counts as a good time for all. There were many fights, one player got ejected, and we noticed that the visiting team's "timeout box" was decorated with flames. Fitting? I thought so. These are the things that make a hockey game good, in my opinion. I am an enigma, I know.
Tuesday, February 28, 2012
Saturday, February 18, 2012
Not New - Previously Owned
Thrifting (and other sources of acquiring used items) is becoming a way of life, whether from necessity or curiosity or just being smart with money. Better for the environment and sort of a treasure hunt and maybe even a sport.
I love that there are places where you can find good quality items and make them useful, re-purposed and loved again. For the longest time I was sure that people only donated what they couldn't get rid of in yard sales at the local charity stores, but then I found a huge building full of stuff worth our time. The Waterfront Rescue Mission. They even sell brand new mattress sets and big items like pianos. I still wish I had a spot for the antique school desk! It had the inkwell hole and looked like it was made of walnut.
Tyler got a wood toy box, whose flat lid doubles as his cooking stove, a toddler sized BMX bike for a tenth of the cost of a new one, and the most necessary part of any cowboy outfit, the boots and hat!
He has worn these every day since we bought them. I think he would sleep in the boots if allowed. He is Sheriff Tyler, riding Bullseye around the yard, escorting me on errands, and charming all the ladies wherever we go!
The bike is put away until his birthday. I have to save something for next month! I am really doing well at spoiling him, as all Nanas are required to do. You try to say NO to this face!
I also met a very nice woman at the supermarket who let me know I didn't need to pay for the training wheels I was about to buy. She had some for free if I wanted them, and her garage was full of toys waiting for a someday yard sale. Score!
We went to her house a few days later and hauled home a mini golf set (Step 2 Par 3), a Vtech game system with 5 games, and the much anticipated Black and Decker Junior Power Tools Workshop! Plus the training wheels. It was Christmas all over again!
I swear it was my intention to not buy anything else for him. Really! But these were too good to pass up. Right?
You can see the toy box in the background. Tyler spent the whole afternoon running from the tool bench to the mini golf set.
The mini golf will be a big hit at the birthday party. On sunny days it will be our outside entertainment. Yesterday was rainy, then muggy, so we played indoors.
If these tools were real (and they do make noise and have whirling parts) I'd already have holes in the bedroom walls. He told me he was building me a new house and that he's an architect. At bedtime Tyler said "Good night, tools!"
I think he's in love.
Friday, February 17, 2012
Homemade Finger Paints
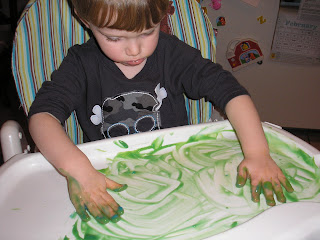
This week we made finger paints. My grandson has not experienced messy hands too much. He does not like "dooty hands", and that needs to change, right? I told him if he wants to be a farmer this Spring and grow his own garden, he'll need to like dirty hands. With that in mind, he was happy to give it a try. And he liked it after all!
(Look at those cheeks! He's getting ready to grow some more. This might be the last time we see baby cheeks on the boy. He turns 3 next month! Sigh...)
I found the recipe on Pinterest. Yes, I have been sucked into the vortex that is ablack hole wealth of cool ideas and recipes etc! Time is lost, big plans are made, life goes on without you. It is fascinating all the things you can see and learn on this site! There are recipes for bathtub crayons, tree house and play kitchen ideas, and tons of crafts. I was am in awe.
Once I figured out that the direction to "Warm until it thickens" part of the directions meant 2 and not the actual Low setting on my electric stove, it took about half an hour for the contents of the sauce pan to gel. I stirred every 10 minutes or so with a whisk. One it starts to resemble pudding, you set it aside and let it cool. Then you add food colorings and the fun begins!
Here is the recipe:
Mix all the ingredients in a saucepan and warm until thickened. Set aside to cool. Pour into containers. Add food coloring.
I ended up making a second batch because Tyler could see right away that the primary colors we created should make the secondary colors he loves, like orange and green.
Mine came out to a pudding consistency. I hope that is right. It seems a bit too thick to me, but the texture seems good for a first time finger painting exploration. I told him we could try this with chocolate pudding some time too.
Doesn't it look like yogurt? I am glad he didn't try to eat any, although it should be harmless if he did.
Was this a great opportunity to also do more measuring? Yes. To explain how to make a level scoop? Yes. What is the difference between a tablespoon and teaspoon? Yes. And cooking and patience too. Oh yes.
Watching how a few drops of color can make fabulous shades of red, yellow or blue, then mixing those to make more colors was fantastic for him. A revelation.
Tyler and I found that the paint was a bit heavy for painting on paper. This is why I think it may have been too thick, but the consistency was perfect for his high chair tray.
The dvd Blue's Clues Shapes and Colors, has been in his collection for a while. It came to life on paint making day. We are going to have a whole rainbow of finger paints just as soon as I get more containers!
If you have experience making this, I'd love to hear your review. If you try it with your little one, let me know!
See you next time! Happy painting!
(Look at those cheeks! He's getting ready to grow some more. This might be the last time we see baby cheeks on the boy. He turns 3 next month! Sigh...)
I found the recipe on Pinterest. Yes, I have been sucked into the vortex that is a
Once I figured out that the direction to "Warm until it thickens" part of the directions meant 2 and not the actual Low setting on my electric stove, it took about half an hour for the contents of the sauce pan to gel. I stirred every 10 minutes or so with a whisk. One it starts to resemble pudding, you set it aside and let it cool. Then you add food colorings and the fun begins!
Here is the recipe:
3 TBSP sugar
1/2 tsp salt
1/2 cup cornstarch
2 cups water
I ended up making a second batch because Tyler could see right away that the primary colors we created should make the secondary colors he loves, like orange and green.
Mine came out to a pudding consistency. I hope that is right. It seems a bit too thick to me, but the texture seems good for a first time finger painting exploration. I told him we could try this with chocolate pudding some time too.
Doesn't it look like yogurt? I am glad he didn't try to eat any, although it should be harmless if he did.
Was this a great opportunity to also do more measuring? Yes. To explain how to make a level scoop? Yes. What is the difference between a tablespoon and teaspoon? Yes. And cooking and patience too. Oh yes.
Watching how a few drops of color can make fabulous shades of red, yellow or blue, then mixing those to make more colors was fantastic for him. A revelation.
Tyler and I found that the paint was a bit heavy for painting on paper. This is why I think it may have been too thick, but the consistency was perfect for his high chair tray.
The dvd Blue's Clues Shapes and Colors, has been in his collection for a while. It came to life on paint making day. We are going to have a whole rainbow of finger paints just as soon as I get more containers!
If you have experience making this, I'd love to hear your review. If you try it with your little one, let me know!
See you next time! Happy painting!
Monday, February 13, 2012
Happy February 14th!
This is my front entryway. On sunny afternoons, the light through the door and side panel is quite glaring. Harsh. Way too revealing of dust motes and dust bunnies. You follow? We've lived here in NW Florida for 7 years in our West facing house and I have often pondered how to solve this problem, since the door is metal. Drill holes in metal for a curtain? No. Too permanent and marring.
Do you remember the Christmas Advent Calendar that was hanging here a few months ago? I happened to find a magnetic curtain rod at the store and I actually planned to use it on the refrigerator when I realized it would adhere to my front door and that is when the light bulb went on over my head.
Don't you love those light bulb moments? I never imagined there might be a magnetic curtain rod!
The light bulb went back on again just after the New Year when I was catching up on blog reading and saw that Another Year of Schibbles was starting, and dang, they were using the Full House pattern I had recently purchased!
Miraculously, my two brain cells collided. "Hey! These Schnibbles are just about the right size to cover the front door windows! No more indecision about what fabric to make a door curtain with! And I could change it out every time I make a new Schnibble! AND I can try to keep up with the AYOS girls this year! Win, Win!" Wouldn't you know I had a few charm packs gathering dust, and a few I had my eye on recently?
I finished the quilting and binding and sleeve on Full House Sunday night. I know my quilting has a long way to go, but I actually like looking at it and seeing where I have room to grow and where I have not done so badly.
I bought (expensive) Sulky thread in a shiny light peach color and I doodled flowers all over the quilt.
This month the Schnibble is ISTH... but they are sold out most places and I just don't want to pay almost the cost of the pattern in shipping fees. So, I will see what they are doing in March instead. February is half over and I don't want to rush through a substitute when I can take my time making something I really like starting March 1.
Are you Schnibbling?
I hope you have a wonderful February 14th. I find Valentine's Day to be overrated. And hurtful to those with relationship expectations that have not been met, or were recently crushed. I hate hearing the heartbreak of "he/she dumped me right before Valentine's Day!!!?" so let's just say Happy February 14th and try to love each other EVERY day, shall we?
Wednesday, February 8, 2012
Dress Up Clothes - a short tutorial
I have been using a kids costume pattern to make "leisure pants" for Tyler for about a year. He has like 20 pairs to play or sleep in. Dinosaurs, aliens, Veggie Tales, elephants, outer space, you name it, I have probably made him a pair of pants from the novelty fabric du jour. I make these pants in under half an hour. You can too, after one pair, you'll whiz through any others.
So today when I happened across the pattern, Tyler was there looking over my shoulder and "Wow!" was what I heard as the envelope was ripped from my hands. Simplicity 3650. How could I have not noticed these kids are dressed in ALL of Tyler's favorite play themes??? He could not believe it. And I, of course, promised I could make him one of each. Soon.
Our errands for the day took us across the street from a large charity thrift store I had never been in, so we went exploring. I have a mental list of things I'd like to not pay retail for. Don't you?
I do not have a wild, bold stripe fabric in my stash, which pirate pants need. We searched for and found a men's XL button down shirt that would do nicely for pirate pants.
The first step is to cut off the button plackets, collar, yoke, and sleeves. This pattern for pull on (elastic waist) pants has only 2 pieces. My favorite kind. What kid needs side seams in pajama/ play time pants? Cut one side of the pants from the back of the shirt. I am making a size 4T, so that is all I could manage from the back of the XL shirt. No worries, we still have 2 fronts to work with.
I took the 2 fronts and sewed a seam where the buttons used to be. Voila! Another good sized piece to cut the second leg from! Picking the pocket off was the most tedious part of this project.
Here you see the leg cut from the back of the shirt laid on top of (and right side down) on the pieced-from-the-front section. Just cut around the first leg to get the mirror image of it as you would with regular fabric cutting. See those indents on each side of the top of the leg piece? That is the part that goes over the lower torso. below that is the leg. You are going to sew those long straight edges together, right sides touching. Patterns typically call for a 5/8 inch seam, and I zigzag afterwards between the stitching and the edge. Then I trim that down to the zigzag stitching to keep the unraveling of fabric to a minimum.
Once each leg has that seam done, it is time to turn one leg right side out and insert it into the wrong side out leg, and match those seams so they are touching. Sew around this curve from one end to the other, and turn it all right side out. You can zigzag that seam before turning or sew a second seam for strength. Your little one's booty will put some stress on that seam. Believe me.
Now all you need to do is hem the legs and make a casing for elastic. I used 3/4" elastic. Measure around your little one's middle and add 2 inches. You will overlap an inch at each end after you feed it through the casing.
For the casing, fold down the top of the pants about 2 inches. Turn under a 1/4" of that and press it, then stitch all the way around except for about 1 1/2 inches. Put a large safety pin through one end of your measured elastic, insert the closed safety pin into the opening in the casing and start feeding it through, bunching the fabric as you go. When it comes out the opening from the other side, overlap those inches, pin it, and sew through both layers. Adjust by pulling so the elastic goes inside the casing completely and then sew that little opening shut.
You are done! You made a pair of pull on pants, perfect for play, and really great for potty training!
Someone had given me this gold jacket lining fabric and it was a perfect match for a pirate sash / sword holder.
Next up for me, a thrifted black vest that will get scaled down to fit the little man and complete the pirate look.
Happy Sewing!
So today when I happened across the pattern, Tyler was there looking over my shoulder and "Wow!" was what I heard as the envelope was ripped from my hands. Simplicity 3650. How could I have not noticed these kids are dressed in ALL of Tyler's favorite play themes??? He could not believe it. And I, of course, promised I could make him one of each. Soon.
Our errands for the day took us across the street from a large charity thrift store I had never been in, so we went exploring. I have a mental list of things I'd like to not pay retail for. Don't you?
I do not have a wild, bold stripe fabric in my stash, which pirate pants need. We searched for and found a men's XL button down shirt that would do nicely for pirate pants.
The first step is to cut off the button plackets, collar, yoke, and sleeves. This pattern for pull on (elastic waist) pants has only 2 pieces. My favorite kind. What kid needs side seams in pajama/ play time pants? Cut one side of the pants from the back of the shirt. I am making a size 4T, so that is all I could manage from the back of the XL shirt. No worries, we still have 2 fronts to work with.
I took the 2 fronts and sewed a seam where the buttons used to be. Voila! Another good sized piece to cut the second leg from! Picking the pocket off was the most tedious part of this project.
Here you see the leg cut from the back of the shirt laid on top of (and right side down) on the pieced-from-the-front section. Just cut around the first leg to get the mirror image of it as you would with regular fabric cutting. See those indents on each side of the top of the leg piece? That is the part that goes over the lower torso. below that is the leg. You are going to sew those long straight edges together, right sides touching. Patterns typically call for a 5/8 inch seam, and I zigzag afterwards between the stitching and the edge. Then I trim that down to the zigzag stitching to keep the unraveling of fabric to a minimum.
Once each leg has that seam done, it is time to turn one leg right side out and insert it into the wrong side out leg, and match those seams so they are touching. Sew around this curve from one end to the other, and turn it all right side out. You can zigzag that seam before turning or sew a second seam for strength. Your little one's booty will put some stress on that seam. Believe me.
Now all you need to do is hem the legs and make a casing for elastic. I used 3/4" elastic. Measure around your little one's middle and add 2 inches. You will overlap an inch at each end after you feed it through the casing.
For the casing, fold down the top of the pants about 2 inches. Turn under a 1/4" of that and press it, then stitch all the way around except for about 1 1/2 inches. Put a large safety pin through one end of your measured elastic, insert the closed safety pin into the opening in the casing and start feeding it through, bunching the fabric as you go. When it comes out the opening from the other side, overlap those inches, pin it, and sew through both layers. Adjust by pulling so the elastic goes inside the casing completely and then sew that little opening shut.
Someone had given me this gold jacket lining fabric and it was a perfect match for a pirate sash / sword holder.
Next up for me, a thrifted black vest that will get scaled down to fit the little man and complete the pirate look.
Happy Sewing!
Sunday, February 5, 2012
Another Successful Project at Kids Clinic and More
The first Saturday of the month - not every Saturday, as I originally had thought - is Kids' Clinic at Home Depot. As I anticipated, this month's project is a Valentine's gift for Mom. How sweet is that? Funny how a lot of the others there were also grandparent and child combinations.
Can you tell that someone is really happy to swing a real hammer? He feels so grown up, I can tell.
The Keepsake Box, like their other projects are really pretty simple to make. And it is FREE! This one involved gluing the 4 mitered sides around the base, securing them with rubber bands while it dried, hammering the decorative heart onto the lid with 2 tiny nails, and then painting and decorating the whole thing before taking it home.
Now of course a 3 year old would not be able to hold the four sides against the base and wrap the rubber bands around it, but that was the most difficult part. He loved the whole process. The fact that Mama can keep her earrings in it is a plus.And it is FREE!
Look at the foam brushes and bottles of paint set up for the kids. A big bag of foam stick on letters and shapes are there too. Everyone is so polite and patient. Parents spending time with their kids. It is really a nice thing to witness and be a part of.
The finished project is: pink base, pink heart on red top and green polka dots. Mama loves it, of course! And it was FREE! Did I say that already?
Also this weekend, I painted the back of his bedroom door with chalkboard paint. Did you know it is available in tints now? Tyler chose Pea Pod Green. 3 coats and it is now back on the door frame. We have very little smooth cement around here, so his sidewalk chalks collection is sadly underused. With all the blogs and magazines singing the praises of chalk-boarding a wall or door in your house, I thought "why not?" When he's older, if they still live with us, school reminders and game schedules could be written on there. For now, it will be free form drawing and letter/number writing. Cost $14.95 plus tax. Cheaper than buying a framed chalkboard in basic black.
I must admit, this looks pretty tacky with the wood frame, now that it is done. Not something you'd see on Beneath My Heart blog, or Our Vintage Home Love blog. But my intentions are there. I had fun in mind more than style, I guess. The wood door frame matches 2 sets of folding slatted closet doors. When the room was just turquoise and white walls, the wood looked pretty cool. I now have to decide if I want to tackle painting the folding doors and frames. The ones I just did for my daughters room were a PAIN in the BUTT. Ugh. Maybe if I just replace the ugly old brass door knob I'll feel better about this? Your thoughts?
Also this week was an amazing gift. From the pediatrician, no less. It seems her girls did not really care for a wooden castle and figurines set they received. When Tyler, her "favorite patient", talked about being a knight, she left the exam room and came back with this!It has archers, a knight and a standard bearer. 2 ladders, a draw bridge and so much potential. Now we will be on the lookout for cannons and horses and villagers, I suppose. Have we had a blast already with invading robots and dinosaurs. Tyler is going to be so ready for the Renaissance Fair in March, he won't know what to do first! And guess who spotted the cutest knight dress up costume on Amazon? And children's picture books about knights too.
I tell you, being a full-time Nana is awesome!
Wednesday, February 1, 2012
Schnibbling Along: the Full House version
Today was the deadline for submitting your finished "Full House" Schnibbles quilt to the Year of Schnibbles girls. I am a bit late. Just a little. Not that the quilt is done, but I did get the top put together today. Without borders. All I can say is, Hey, I might be really done by Valentine's Day, which is my personal goal for this.
Do you participate in the Year of Schnibbles? I had a bit of trouble with the roof pieces. I wonder if anyone else did?
My version is made with Moda's Chemistry fabric line charm packs. I bought some coordinating Kona solids (the dark raisin-y color and the light peachy pink) to add to the selection, since the Chemistry charm packs consist of 4 or more of each print. I was disappointed about that, but what can you do? I bought online to get a deal, because the prices at quilt shops - where I can look in person at the contents - always make me put back what I have inspected.
I'd like to guarantee that I am going to do every Schnibble for the whole year along with the group, but next up is I.S.T.H. and I don't have that one. I plan to substitute a different Schnibble from one of Carrie Nelson's books instead. Who's with me?
My hat is off to all the blogging mommies out there who get so much done while toddlers and the older siblings run laps around their legs, leaving a wake of toys and clothing throughout the house. I no longer wonder why I did not take up quilting when my kids were little. I was lucky to make the occasional Halloween costume and Christmas outfit! And I was so much younger then. Ugh...
Now that I am home full time with Tyler, I just can't accomplish everything I plan to do each day. Almost 3 year old boys are VERY busy, and they get real squirrely if they don't get outside to play. Nap time comes around and I have to prioritize what gets done. Lucky for you I chose quilt top finishing over clean floors today! As Scarlett said, "I'll think about that tomorrow."
Stay tuned for a blog post about what these Schnibble quilts are going to be used for!
Subscribe to:
Posts (Atom)